Customizing OS X - Part 1: Icons
If you take a search around the internet, you’ll quickly find that customizing your operating system is a pretty big deal, well, for some at least. I’ve never really indulged in a serious customizing session as it wasn’t my thing, especially as OS X is gorgeous enough to look at as it is. But what if you want to take things a little further? Perhaps the brushed metal look, as found on Safari and Finder, doesn’t tickle you? Maybe you feel the icons in OS X are a little too, shall we say, ancient looking?
Over the next two weeks, I’ll be going through how to customize OS X to your liking and give you a handy list of resources from which to download a bunch of themes and icons. What will it involve? Two applications, about 20 minutes of your time and some happy faces at the end.
Icons
There’s already a couple of ways to change icons in OS X, but these aren’t always reliable and it’s not the easiest thing in the world to revert back to the default icons should you change your mind. Fortunately though, there’s an application called CandyBar, which was developed by the same people who created Transmit, the excellent FTP client for OS X.
Step 1: Download and install
The latest version of CandyBar is 2.6.1 and requires OS X 10.3.9 or higher - some of you will also be pleased to hear it’s now Universal too. According to The Icon Factory, CandyBar is “quite simply the easiest, quickest and by far, the safest way to customize the icons found in the system and application toolbars for Mac OS X. But CandyBar doesn’t stop there, oh no. CandyBar also lets you customize apps, folders, clippings, icons, locations and even the OS X trash icon”. A slightly long-winded description of what it does, but you get the point. You can download here or for a direct link, download here - it’s about 4MB in size as well, so it won’t be breaking the bandwidth limit any time soon.
Once you’ve downloaded, install as any other application by dragging the CandyBar.app to your applications folder. Step one, done!
Step 2: Learning the features
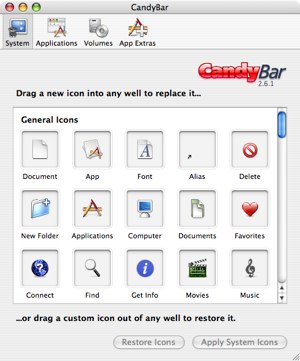
When you first open CandyBar, you will notice a screen similar to the screenshot below. You have four tabs at the top, these are: System, Applications, Volumes and Apps Extras. The System tab allows you to change virtually every icon within your system, such as folders, the applications icon, computer icon and even the hard-drive icon. The other three tabs follow a similar suit, but allow you to change certain application icons and certain volume icons (such as your iPod icon).
There are two ways to install new icons. You can either visit a few websites - which I’ll list shortly in Step 3 - and download what is called an ‘icontainer’, which literally has a group of icons that, when double clicked on, are automatically placed into CandyBar and ready to be applied, or you can hunt down or make different icons yourself, and manually change each icon to your liking. The latter option is for those who wish to take customizing to the next level and will of course take more time.
You’ll also be pleased to know that CandyBar keeps a backup of you default icons, so that if you should ever decide you wish to go back to the original icons that came with OS X when you first purchased your computer, you can do so.
Step 3: Locating icons
As I said before, there are two ways to find and install icons. The first is to download an Icontainer, which normally includes most, if not all, system icons in a certain theme, or you can download (or even make your own) icons individually and install them manually within CandyBar.
A list of websites you might like to visit, include:
The Icontainers you should aim to download are for CandyBar. However, if you find that there are no icontainers for CandyBar, you can download the icons as individual images (normally in a .bin or .dmg file) which can then be inserted into CandyBar manually.
Step 4: Installing icons
There are two ways to install icons using CandyBar, the first is Icontainers. When you’ve downloaded an Icontainer, simply double clicking on the package will automatically load them into CandyBar. Before you download you should find a description of the icons you’re downloading, including what theme they are, how many there are and which icons they will replace. Once the icons are placed into CandyBar, it’s simply a case of clicking on “Apply System Icons”. This doesn’t require a restart of your computer, just the Dock and Finder, which takes a matter of seconds. OS X, being the security conscious operating system that it is, will of course ask you to enter your Administrator password before you proceed.
Once done, you should notice a few pleasant changes around your system, take a look at my screenshots below to see how mine has changed.
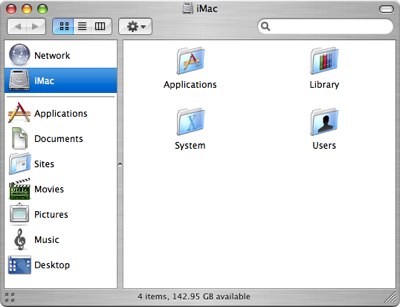
Before
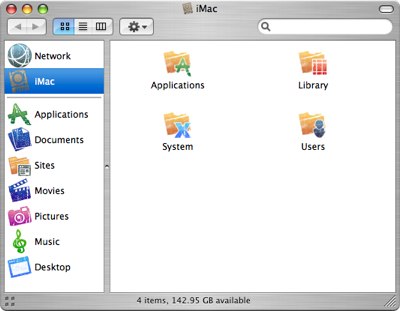
After
The other way of changing icons within CandyBar is to manually drag icons to be replaced individually. This takes a lot longer to do, but does give you more control over which icons you want replaced. By going to the websites listed above, any icons you do find should come in a variety of formats. Icontainers will be one of them, but if you find there are no Icontainers available for CandyBar, search for .bin or .dmg for e.g. packages to which you can download. Once they’re on your computer, spend some time sorting through the icons and decide which you want. They’ll normally all be pretty obvious as to where they are supposed to be placed and will then require you to simply drag the new icon onto the relevant [old] icons within CandyBar.
Once you’re happy, simply hit “Apply System Icons” as before.
In both procedures above, you’ll twice be told that Finder and the Dock have to be relaunched, simply click on “Relaunch Finder” and “Relaunch Dock”.
Step 5 (Optional): Removing icons
If you’re not happy with a particular icon, then remove it. How? Find the icon you want to remove and return to default (or replace with another icon) and then drag it out of CandyBar completely. You’ll notice it disappearing in a puff of smoke and the original system icon will reappear. By hitting “Apply System Icons” again, the new [original] icon will be back in place.
If you wish to set every icon back to the default system icon, quite simply hit “Restore Icons” and watch as your system is returned back to normal, all without restarting your computer.
Summary
Following the steps above, you should now have successfully changed your system icons to something much more attractive and suited towards your style. As I mentioned before, there’s another application called Pixadex which gives you a little more control over your icons - that can also be downloaded via Icon Factory. For the newbie-theme-changer out there though, CandyBar will give you enough freedom to play around and see what interesting ideas you can come up with.
CandyBar is free to download but comes with a 15 day trial limit or 25 uses of the “Apply” button (whichever comes first) and will require registration, which costs about $12.95 (£7). It’s definitely worth giving a go though and I know of a few friends who have purchased a copy of this.
Next Wednesday I’ll be running over how to change the overall theme of OS X to something that suits your mood, all safely, easily and reliably.
 del.icio.us
 Digg
Digg Facebook
 Slashdot
 StumbleUpon

Comments
Good article. I like when you write articles about OS X. Customizing, learning about different features etc. That and your reviews about different products, programs and software to make your Mac experience more productive, easier and more enjoyable. Keep these articles and reviews coming.
Thanks Mac Man, appreciate your comments. I remember what it’s like being a new computer user and how frustrating it was to not be able to do a few things due to a lack of good articles on the internet to help me - so that sort of thing helps when I write. Glad you like it.