
A Guide to Migrating from Mail 2.0 to Thunderbird 1.5
Earlier this week in Ask Apple Matters I answered a users question regarding migrating from Mail 2.0, found in OS X Tiger, to Mozilla Thunderbird 1.5. For those that have tried the built in migration wizard found in Thunderbird, you’ll notice there is no option for migrating from Apple’s Mail program. A quick check on Mozilla’s support site will show an out of date (although still valid for previous releases of Mail.app) guide on how to import mail messages from Mail, but the guide doesn’t work for Mail 2.0.
What’s a Thunderbird loving computer nerd to do? Sure, you could e-mail yourself each and every e-mail, you could mark all e-mails as unread on the web server, but nothing would be quite as simple as simply importing all the e-mails over.
With the help of this guide, a simple and free program, plus a little patience and you’ll soon find yourself using Thunderbird 1.5 for your e-mails.
Why doesn’t Thunderbird let me import e-mails from Mail 2.0?
Simply put, it’s no ones fault, although if you had to blame anyone, it would be the fruity computer giant. You see, e-mails are generally stored in a Local Folder (local being on your computer) within the main directory of your e-mail Client (Mail, Thunderbird, Outlook etc). Each mail message is then stored within a file or a box, if you will, called an Mbox (.mbox) for the sake of easy organisation. This is the old and still most used way of storing e-mails. However, with the introduction of Spotlight, Apple had to have each mail message indexed so that they could be brought up in a Spotlight search. The only way for this to happen with ease was to store e-mails as individual files (.emlx), rather than in a box.
Therefore the easiest solution at present is to gather up all of those individual e-mails and put them into one of those boxes for Thunderbird to read correctly. Sounds quite messy, right? Wrong. Thanks to someone who had the time and patience to do this, we’ve now got a lovely little program that does the boxing up for us.
Let us begin
Step 1 – Download a tool
Go along to http://www.cosmicsoft.net/emlxconvert.html and download the Macintosh version of EMLX Convert. You’ll see for yourself how much time this program saves a little later on, so I think it’s only right that you send the developer a little donation.
Step 2 – Locate your Mail 2.0 e-mail messages
This is a relatively straightforward process. Open up Finder, click on Macintosh (or name of your HDD) > double click Users > your username folder > Library > Mail > and then double click on the e-mail account folder you wish to take e-mails from, usually .(JavaScript must be enabled to view this email address). Once you’re in that folder, double click on Inbox.mbox folder > Messages.
We’re finally there. Depending on how many e-mails you actually have, you should see a long list of files with the Mail logo on them and a file name of something like ##.emlx (where ## represents a number). Just so you get a better understanding of what these files are, double click on one of them. With a bit of luck you should see a mail message open up in Mail 2.0 and you can therefore work out from that, that these files are indeed your e-mail messages.
Step 3 – Convert those e-mails
Highlight all of those e-mails using Command+A and then drag them into the EMLX Convert program window. Once the lists of e-mails appear in EMLX Convert, click on “Save Mbox…” and save to a location on your hard-drive you can gain easy access to, generally the desktop. This next part isn’t required, but for the sake of making things easy for yourself, rename the .mbox file within the folder created to something that represents the e-mail account you’re migrating. For example, rename to GoogleMail-Inbox.mbox if you’re migrating your GoogleMail account.
Step 4 – Moving the converted files
As before, we need to locate the e-mail storage folder but for Thunderbird. To do this open up Finder, click on Macintosh (or name of your HDD) > double click Users > your username folder > Library > Thunderbird > Profiles > ********.default (where * is a combination of letters and numbers) > Mail > Local Folders.
Not quite as simple as before but it should be easy enough for you to get there if you follow my instructions correctly.
Next, go back to your desktop and copy the .mbox file created in Step 3 over to your Local Folders folder within the Thunderbird directory.
Step 5 – Open Thunderbird and wait
When you open Thunderbird you may not notice your e-mails right away, this is down to Thunderbird sorting out a few settings that won’t take affect until the next time you restart Thunderbird. In the mean time, create your e-mail account settings by going to Tools > Account Settings > Add Account. Follow the wizard as you would with any other e-mail client and enter your e-mail settings into there.
The next time you open up Thunderbird, you should see a couple of extra items in your Folders column. Take a look at my screenshot below to get a better understanding of what I mean.
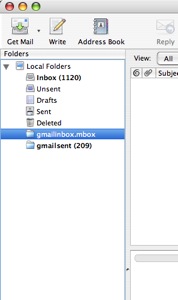
These extra item(s) are the .mbox folder(s) you copied over into the Thunderbird directory – much to your delight they contain all of your e-mail messages. Simply copy all the messages out of the .mbox folders, into your Local Folders folder (within the Thunderbird program) and you’re all done.
 del.icio.us
 Digg
Digg Facebook
 Slashdot
 StumbleUpon

Comments