Making Adjustments in iPhoto ‘09
Last week's column on iPhoto '09's Faces has gotten a good amount of critical and well deserved feedback about the tool. I'm pretty sure that Apple will be finding ways to improve Faces so that it can live up to the expectations of consumers.
There are other features in iPhoto '09, such as the Flickr export, that I could be critical of, and I think since Apple charges full price for each update of its iLife suite, it's only fair that it receive much critical feedback. But I thought I'd use this week's column to describe a very useful feature in iPhoto '09, the Adjust tool, which has gotten better with each major upgrade of iPhoto.
With digital photography, it's every easy to take several hundreds of photos at a time, with no added expense. But just because you take 500 vacation photos doesn't mean you have to process them all. You can choose some of your best photos from the shoot and take a little extra time to improve upon them using iPhoto's post-production tools. Apple has made the exposure and color adjustment process in iPhoto fairly easy and in some cases less time consuming than working in Adobe Photoshop Elements or one of the larger CS programs. This article will describe how to use the Adjust tool on an average photo.
Our Original Photo
Let's take a typical photo that you might capture at an amusement park. The photo below, except for the added annotation, has had no adjustment made to it. Here are a few problems with the picture: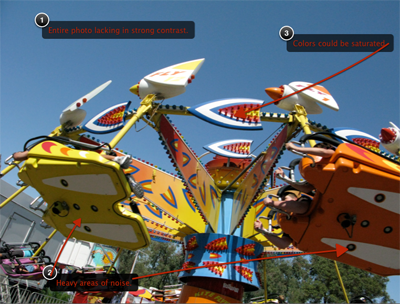
1. The lighting in the photo is dull and lacking in strong color contrast.
2. The colors in the photo could be more saturated.
3. And lastly there is some digital noise in the photo. Digital noise is basically caused by using a high ISO setting on the camera. This photo was shot at ISO 400 (which is the default ISO setting that I use on both my Canon Powershot G9 and my Canon 50D.) ISO 400 works pretty well for average daylight outdoor and indoor lighting, and it's not so high that it causes real digital noise problems. Noise is visible in this photo, but iPhoto can fix it pretty well.
Using the Adjust Tool
The Adjust tool has four areas that you can work through to improve the exposure and color of a photo. Some adjustments you make will be corrections to problems in the photo, while other adjustments will be enhancements and sometimes radical changes to an image. 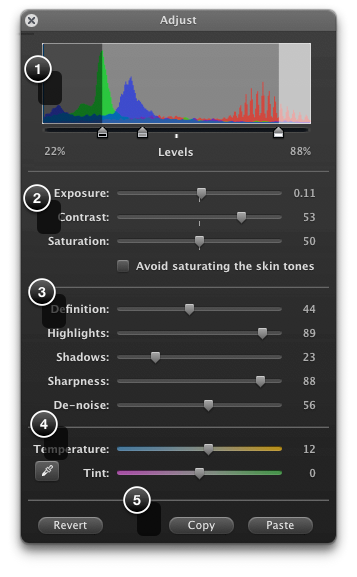
1. The top Levels part of the Adjust panel is where you want to start. If you move the sliders in the second section of the Adjust panel, you'll see that it makes similar adjustments to the Levels slider. The right side of the Levels slider is what you use to make a photo brighter by moving the slider toward the left. The left side of the slider is used make the photo darker, by moving it toward the right. And of course the middle of the slider affects the mid-tones of the photo. The difference between Levels and Exposure is that the latter impacts the entire image, whereas Level adjustments affect just either the highlight, shadows, and mid-tones of the image.
The beauty of the Adjust tool is that you can make as many adjustments as you like, and your original image will not be touched. You can always use the Undo shortcut keystroke (Command+Z) or the Revert button at the bottom of the panel to get rid of your adjustments. So there's nothing keeping you from experimenting. Also note, however, that changing the exposure level of a photo in the iPhoto library also changes the appearance of that same photo if it is used in a slideshow, book, or calendar of iPhoto. If you want two separate versions of an image, you need to duplicate the image (Photos>Duplicate or Command + D) and then make the adjustments.
2. Next, move to the Exposure, Contrast, and Saturation sliders of the Adjust tool. If the overall photo is too dark, move the Exposure slider to the right. If it's too dark, move it the left. Rarely should you need to move the slider to extreme left or right if you made a fairly good and correct exposure when initially taking the photo.
The Contrast slider is is one of the most useful adjustments you can make to improve your photos. You will typically increase the contrast in most of your photos by moving the slider to the right. Move back and forth between the Exposure slider and the Contrast slider to get the enhancement you want. Earlier versions of the Adjust panel included a Brightness slider next to the Contrast slider, but Apple was smart to get rid of it. The Exposure slider does the same thing as the Brightness slider.
If the colors in your image seem rather dull or cloudy, the Saturation slider can help. You move the slider to the right to increase the saturation, and if you want to desaturate the image to see how it might look in black-and-white, then move the slider all the way to the left. (Desaturating the photo, however, is not the best way to create a quality black-and-white or monochrome image.)
3. The 3rd part of the Adjust tool is mainly for fine tuning. The Definition slider adds more detail and a boost in contrast in parts of the image. It almost seems as if it sharpens the image. The Highlights and Shadows sliders work similar to the Exposure and Levels sliders. Move the Highlights slider to the right if you want to bring detail the brightest part of the image. This slider won't be very effective if you have over exposed areas in your image, such as you see with the white bright parts of the photo used in this article. The Shadows slider helps you bring back detail in the darker area of your photo. The Shadows tool can't correct too effectively the over exposed parts of the photo. Neither slider should be taken to the extreme right, at least not with your average photo.
The next slider is the Sharpness tool, but it should typically be the last adjustment you make. The Sharpness tool cannot fix a poorly focused photo, but it can help bring sharpness or detail to fairly focused images. So be sure to hold your camera as steady as possible when taking photos in order to get the best use of the Sharpness tool.
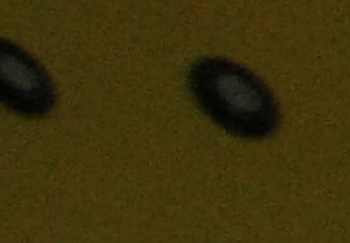
The De-noise slider in my view is pretty good for a consumer-based adjustment program. The noise problem is not always noticeable, but for photos you plan to print, you might want use the De-noise slider to help smooth out some of the digital noise. In the examples below, I zoomed into a part of the sample photo to provide a closer look of digital noise (photo on left), and what difference it makes when the De-noise is applied (photo on right). I use Nik Sotfware's Dfine 2.0 (http://www.niksoftware.com/dfine/usa/entry.php) plug-in for Aperture to take care of all my noise issues. But De-noise does a pretty good job in my view for a consumer application like iPhoto, so it doesn't hurt to apply it.

4. The temperature slider is one of the last tools that you will want to use in your adjustment process. In prior versions of iPhoto, the Temperature slider was near the top sections of the panel, as it is in Aperture 2.0. I think it should have remained near the top because it's one of the first adjustments you might want to make to improve an image. You of course move the slider to right to warm up the photo (like adding warm sunlight to the scene) or take it to the left cool the image down. This temperature slider cannot correct White Balance problems in your image. If for example your original photo is too blue, yellow or purple, the temperature slider really can't correct the problem. If your image is a RAW file, you can open it up in an application like Aperture 2.0 and make the correction. iPhoto will accept RAW files, but you can't get the full editing capabilities of RAW files in iPhoto, in the way you can with Aperture or Adobe's Camera Raw application.
Finally Tint tool is something I rarely use for normal photos. It is there if you add some funky coloring to your photos for various types of color effects.
Effects and Enhance Tools

If all this adjustment stuff is too much for you, then you might just pop open the Effects feature in iPhoto and use that. Click on the Boost Color box and see how it impacts the image. You can click it more than once to increase its application. Sometimes it does a really good job, for a down-and-dirty color enhancement. You can also click and add one or more effects to the same photo to see what happens. If you mess up the image, just click the center Original box to start over.
In the toolbar of iPhoto, there's also an Enhance feature that is a quick color and contrast boosting tool that you might try applying first to see if it improves your photo.
Copy and Paste Adjustments
With iPhoto '08, Apple added a way to copy adjustments you make one photo and apply them to another one. You can only paste adjustments to one photo at a time, which is really a bummer. I figure Apple thinks batch processing exposure and color adjustments might be too overwhelming for the average iPhoto user, or that it might make iPhoto seem more and more like its pro version application, Aperture. Nevertheless, if you use iPhoto a lot, learn to use the copy and paste feature of the Adjust panel. It will save you some time and hassle in the adjustment part of your process. 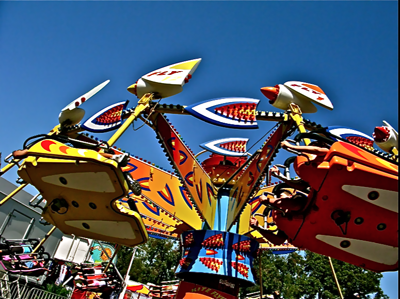
Well, as you can see, this is the result of making adjustments to our sample photo. The colors are richer, the over-all contrast is deeper, and, believe it or not, there's less digital noise in the image. iPhoto is not Photoshop or Aperture 2.0, but it's a great application for those who don't to spend a lot of time managing and processing pictures.
 del.icio.us
 Digg
Digg Facebook
 Slashdot
 StumbleUpon

Comments
The new Edit menu is really awesome, a step up from the previous version.
Thanks for the tutorial. I really don’t see anything in this version of iPhoto that would make me want to spend the money to upgrade to iLife 09. I will have to visit the Apple store and play around with the other applications to see if their incremental improvements are worth the cost. In hard times you have to get along with what you already own and save the money for the worst of times.
Flayboybob, I have to agree with you. The ‘09 version of iLife is really not a must have application. Apple should have at least included a new application in the mix or lowered the upgrade price.
I just discovered one freaking fantastic new undocumented feature in iPhoto 09!
If you hold down Option key when starting iPhoto, it searches your drives and presents a list of iPhoto libraries to choose from!!! (Previously it just presented a dialog asking what you wanted to do)
All we need now is for a way to make this the default startup process.
I’am new to photo editing. How awsome you guys know whats the problem of a photo is. I keep doin adjustments to make photos looks great. and this tutorial helps. Jonathan Berkowitz